Spring Boot 使用 Spring Security (二)
介绍
使用 springboot+mybatis+SpringSecurity 实现数据库动态的管理用户、角色、权限管理。
细分角色和权限,并将用户、角色、权限和资源均采用数据库存储,并且自定义滤器,代替原有的FilterSecurityInterceptor过滤器,并分别实现 AccessDecisionManager、InvocationSecurityMetadataSourceService 和 serDetailsService,并在配置文件中进行相应配置。
数据库表设计
1 | #创建用户表 |
项目结构
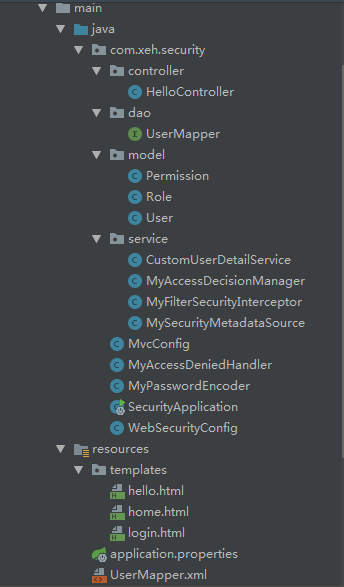
引入 maven 依赖
pom 文件1
2
3
4
5
6
7
8
9
10
11
12
13
14
15
16
17
18
19
20
21
22
23
24
25
26
27
28
29
30
31
32
33
34
35
36
37
38
39
40
41
42<dependencies>
<dependency>
<groupId>org.springframework.boot</groupId>
<artifactId>spring-boot-starter-security</artifactId>
</dependency>
<dependency>
<groupId>org.springframework.boot</groupId>
<artifactId>spring-boot-starter-thymeleaf</artifactId>
</dependency>
<dependency>
<groupId>org.springframework.boot</groupId>
<artifactId>spring-boot-starter-web</artifactId>
</dependency>
<dependency>
<groupId>org.mybatis.spring.boot</groupId>
<artifactId>mybatis-spring-boot-starter</artifactId>
<version>2.0.0</version>
</dependency>
<!--mysql版本根据自身情况调整-->
<dependency>
<groupId>mysql</groupId>
<artifactId>mysql-connector-java</artifactId>
<version>5.1.47</version>
<scope>runtime</scope>
</dependency>
<dependency>
<groupId>org.springframework.boot</groupId>
<artifactId>spring-boot-starter-test</artifactId>
<scope>test</scope>
</dependency>
<dependency>
<groupId>org.springframework.security</groupId>
<artifactId>spring-security-test</artifactId>
<scope>test</scope>
</dependency>
<!--thymeleaf页面展示控制-->
<dependency>
<groupId>org.thymeleaf.extras</groupId>
<artifactId>thymeleaf-extras-springsecurity4</artifactId>
<version>3.0.2.RELEASE</version>
</dependency>
</dependencies>
配置数据库信息
1 | spring.datasource.url=jdbc:mysql://localhost:3306/world |
创建 pojo/dao/mapper/controller 文件
PS: 功能比较简单,所以省略 service 文件,直接调用 dao 层文件;并将权限表的相关查询操作写在同一 mapper 文件
User.java1
2
3
4
5
6
7
8public class User {
private int id;
private String username;
private String password;
private List<Role> roles;
/* Getter 和 Setter 自行补充 */
}
Role.java1
2
3
4
5
6public class Role {
private int id;
private String name;
/* Getter 和 Setter 自行补充 */
}
Permission.java1
2
3
4
5
6
7
8
9
10
11
12
13public class Role {
private int id;
//权限名称
private String name;
//权限描述
private String descritpion;
//授权链接
private String url;
//父节点id
private int pid;
/* Getter 和 Setter 自行补充 */
}
UserMapper.java 1
2
3
4
5
6
7
8
9
10
public interface UserMapper {
//根据用户名查找用户所有权限信息
User findByUserName(String username);
//获取所有权限信息
List<Permission> findAllPermission();
//
List<Permission> findByAdminUserId(int userId);
}
UserMapper.xml1
2
3
4
5
6
7
8
9
10
11
12
13
14
15
16
17
18
19
20
21
22
23
24
25
26
27
28
29
30
31
32
33<?xml version="1.0" encoding="UTF-8"?>
<!DOCTYPE mapper PUBLIC "-//mybatis.org//DTD Mapper 3.0//EN" "http://mybatis.org/dtd/mybatis-3-mapper.dtd">
<mapper namespace="com.xeh.security.dao.UserMapper">
<resultMap id="userMap" type="com.xeh.security.model.User">
<id property="id" column="ID"/>
<result property="username" column="username"/>
<result property="password" column="PASSWORD"/>
<collection property="roles" ofType="com.xeh.security.model.Role">
<result column="name" property="name"/>
</collection>
</resultMap>
<select id="findByUserName" parameterType="String" resultMap="userMap">
select u.*
,r.name
from user u
LEFT JOIN user_role sru on u.id = sru.user_id
LEFT JOIN role r on sru.role_id = r.id
where username = #{username}
</select>
<select id="findAllPermission" resultType="com.xeh.security.model.Permission">
select * from permission
</select>
<select id="findByAdminUserId" parameterType="int" resultType="com.xeh.security.model.Permission">
select p.*
from user u
left join user_role sru on u.id = sru.user_id
left join role r on sru.role_id = r.id
left join permission_role spr on spr.role_id = r.id
left join permission p on p.id = spr.permission_id
where u.id = #{userId}
</select>
</mapper>
HelloController.java1
2
3
4
5
6
7
8
9
10
11
12
13
14
15
16
17
public class HelloController {
public String index(){
return "hello";
}
public String home(){
return "home";
}
public String login(){
return "login";
}
}
页面文件
home.html1
2
3
4
5
6
7
8
9
10
11
<html xmlns="http://www.w3.org/1999/xhtml" xmlns:th="http://www.thymeleaf.org"
xmlns:sec="http://www.thymeleaf.org/thymeleaf-extras-springsecurity3">
<head>
<title>Spring Security Home</title>
</head>
<body>
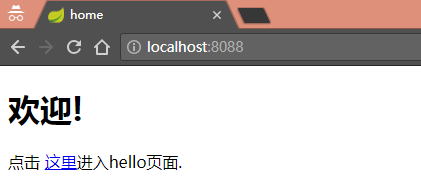
<h1>欢迎!</h1>
<p>点击 <a th:href="@{/admin/hello}">这里</a>进入hello页面.</p>
</body>
</html>
hello.html1
2
3
4
5
6
7
8
9
10
11
12
13
14
15
16
17
18
19
20
21
22
23
24
25
26
27
<html xmlns="http://www.w3.org/1999/xhtml" xmlns:th="http://www.thymeleaf.org"
xmlns:sec="http://www.thymeleaf.org/thymeleaf-extras-springsecurity3">
<head>
<title>Hello World!</title>
</head>
<body>
<h1 th:inline="text">Hello [[${#httpServletRequest.remoteUser}]]!</h1>
<div sec:authorize="isAuthenticated()">
<!-- 用户认证通过才能才显示 -->
<p>用户名:<span sec:authentication="name"></span></p>
<p>权限:<span sec:authentication="principal.authorities"></span></p>
</div>
<div sec:authorize="hasRole('ADMIN')">
<!-- 用户角色为“ADMIN”才显示 -->
<p>【管理员】才能看见的内容</p>
</div>
<div sec:authorize="hasRole('USER')">
<!-- 用户角色具有“USER”权限才显示 -->
<p>【普通用户】才能看到的内容</p>
</div>
<form th:action="@{/logout}" method="post">
<input type="submit" value="注销"/>
</form>
</body>
</html>
login.html1
2
3
4
5
6
7
8
9
10
11
12
13
14
15
16
17
18
19
<html xmlns="http://www.w3.org/1999/xhtml" xmlns:th="http://www.thymeleaf.org">
<head>
<title>login</title>
</head>
<body>
<div th:if="${param.error}">
用户名或密码错误
</div>
<div th:if="${param.logout}">
账户已退出登录
</div>
<form th:action="@{/login}" method="post" action="/login">
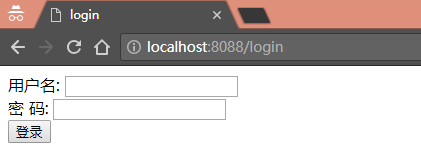
<div><label> 用户名: <input type="text" name="username"/> </label></div>
<div><label> 密 码: <input type="password" name="password"/> </label></div>
<div><input type="submit" value="登录"/></div>
</form>
</body>
</html>
这样,我们就搭好了连接数据库的 springboot 项目,接下来就是添加权限了
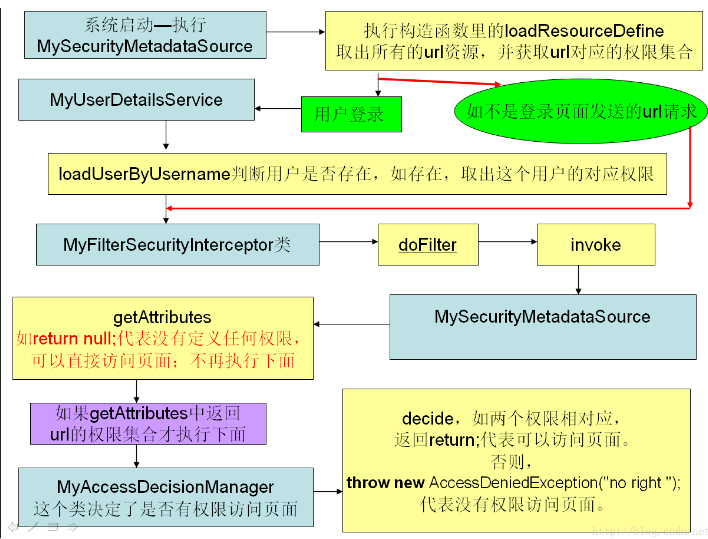
流程图
SpringSecurity 登录认证流程图

SpringSecurity 权限管理流程图
添加 SpringSecurity,实现登录及权限验证
创建 Spring Security 的配置类 WebSecurityConfig
1 | @Configuration |
实现 UserDetailsService(认证管理器)
自定义UserDetailsService 接口(认证管理器),储存用户所有角色1
2
3
4
5
6
7
8
9
10
11
12
13
14
15
16
17
18
19
20
21
22
23
24
25
26
27
28
29
30
31
32
public class CustomUserDetailService implements UserDetailsService {
private UserMapper usersMapper;
/**
* 通过用户名加载与该用户的用户名、密码以及权限相关的信息
* @param username
* @return
* @throws UsernameNotFoundException
*/
public UserDetails loadUserByUsername(String username) throws DisabledException {
User user = usersMapper.findByUserName(username);
if (user != null) {
List<Permission> permissions = usersMapper.findByAdminUserId(user.getId());
List<GrantedAuthority> grantedAuthorities = new ArrayList <>();
for (Permission permission : permissions) {
if (permission != null && permission.getName()!=null) {
GrantedAuthority grantedAuthority = new SimpleGrantedAuthority(permission.getName());
//1:此处将权限信息添加到 GrantedAuthority 对象中,在后面进行全权限验证时会使用GrantedAuthority 对象。
grantedAuthorities.add(grantedAuthority);
}
}
return new org.springframework.security.core.userdetails.User(user.getUsername(), user.getPassword(), grantedAuthorities);
} else {
//throw new UsernameNotFoundException("用户名不存在");
throw new DisabledException("---->UserName :" + username + " not found!");
}
}
}
实现 PasswordEncoder(加密类)
spring security 版本在 5.0 后要添加 PasswordEncoder 验证1
2
3
4
5
6
7
8
9
10
11public class MyPasswordEncoder implements PasswordEncoder {
public String encode(CharSequence charSequence) {
return charSequence.toString();
}
public boolean matches(CharSequence charSequence, String s) {
return s.equals(charSequence.toString());
}
}
实现 AccessDeniedHandler (用户无权限处理器)
用户无权限时处理类1
2
3
4
5
6
7
8
9
10
11
12
13
14
15
16@Component
public class MyAccessDeniedHandler implements AccessDeniedHandler {
@Override
public void handle(HttpServletRequest request, HttpServletResponse response, AccessDeniedException e) throws IOException, ServletException {
//返回json形式的错误信息
response.setCharacterEncoding("UTF-8");
response.setContentType("application/json");
response.getWriter().println("{\"code\":403,\"message\":\"你没有权限访问!\",\"data\":\"\"}");
response.getWriter().flush();
/*//无权限时跳转
response.sendRedirect("/home");
*/
request.getSession().invalidate(); //会话结束
}
}
继承 AbstractSecurityInterceptor(资源管理拦截器)
spring security 版本在 5.0 后要添加 PasswordEncoder 验证1
2
3
4
5
6
7
8
9
10
11
12
13
14
15
16
17
18
19
20
21
22
23
24
25
26
27
28
29
30
31
32
33
34
35
36
37
38
39
40
41
42
43
44
45
46
47
48
49
50
51
52
53
54
public class MyFilterSecurityInterceptor extends AbstractSecurityInterceptor implements Filter {
//获取被拦截url所需的权限
private FilterInvocationSecurityMetadataSource securityMetadataSource;
//获取权限管理器
public void setMyAccessDecisionManager(MyAccessDecisionManager myAccessDecisionManager) {
super.setAccessDecisionManager(myAccessDecisionManager);
}
public void init(FilterConfig filterConfig) throws ServletException {
}
public void doFilter(ServletRequest request, ServletResponse response, FilterChain chain) throws IOException, ServletException {
FilterInvocation fi = new FilterInvocation(request, response, chain);
invoke(fi);
}
public void invoke(FilterInvocation fi) throws IOException, ServletException {
//fi里面有一个被拦截的url
//里面调用MyInvocationSecurityMetadataSource的getAttributes(Object object)这个方法获取fi对应的所有权限
//再调用MyAccessDecisionManager的decide方法来校验用户的权限是否足够
InterceptorStatusToken token = super.beforeInvocation(fi);
try {
//执行下一个拦截器
fi.getChain().doFilter(fi.getRequest(), fi.getResponse());
} finally {
super.afterInvocation(token, null);
}
}
public void destroy() {
}
public Class<?> getSecureObjectClass() {
return FilterInvocation.class;
}
public SecurityMetadataSource obtainSecurityMetadataSource() {
return this.securityMetadataSource;
}
}
实现 FilterInvocationSecurityMetadataSource (读取url资源)
1 | @Service |
实现 AccessDecisionManager (授权管理器)
判断用户请求的资源是否能通过1
2
3
4
5
6
7
8
9
10
11
12
13
14
15
16
17
18
19
20
21
22
23
24
25
26
27
28
29
30
31
32
33
34
35
36
37
public class MyAccessDecisionManager implements AccessDecisionManager {
// decide 方法是判定是否拥有权限的决策方法,
//authentication 是CustomUserService中循环添加到 GrantedAuthority 对象中的权限信息集合.
//object 包含客户端发起的请求的requset信息,可转换为 HttpServletRequest request = ((FilterInvocation) object).getHttpRequest();
//configAttributes 为MyInvocationSecurityMetadataSource的getAttributes(Object object)这个方法返回的结果,此方法是为了判定用户请求的url 是否在权限表中,如果在权限表中,则返回给 decide 方法,用来判定用户是否有此权限。如果不在权限表中则放行。
public void decide(Authentication authentication, Object object, Collection<ConfigAttribute> configAttributes) throws AccessDeniedException, InsufficientAuthenticationException {
if(null== configAttributes || configAttributes.size() <=0) {
return;
}
ConfigAttribute c;
String needRole;
for(Iterator<ConfigAttribute> iter = configAttributes.iterator(); iter.hasNext(); ) {
c = iter.next();
needRole = c.getAttribute();
//authentication 为 CustomUserDetailService 中循环添加到 GrantedAuthority 对象中的权限信息集合
for(GrantedAuthority ga : authentication.getAuthorities()) {
if(needRole.trim().equals(ga.getAuthority())) {
return;
}
}
}
throw new AccessDeniedException("no right");
}
public boolean supports(ConfigAttribute attribute) {
return true;
}
public boolean supports(Class<?> clazz) {
return true;
}
}
测试
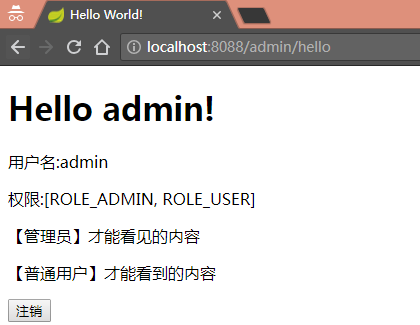
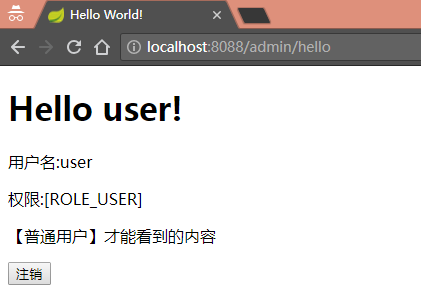

踩坑
加密方式
WebSecurityConfig 配置文件认证规则方法”configure(AuthenticationManagerBuilder auth)” 报错java.lang.IllegalArgumentException: There is no PasswordEncoder mapped for the id "null"
原因: spring security 版本在5.0后,之前版本中的 NoOpPasswordEncoder 被 DelegatingPasswordEncoder 取代了,而你保存在数据库中的密码没有指定加密方式,就要加个 PasswordEncoder 验证
认证管理器异常抛出
CustomUserDetailService 类 loadUserByUsername 默认抛出 UsernameNotFoundException,用 DisabledException 替换 UsernameNotFoundException
这里我们不抛出 UsernameNotFoundException 因为 Security 会把我们抛出的该异常捕捉并换掉,导致抛出的异常无法被 ControllerAdvice 捕捉到,无法进行统一异常处理;所以我们只需要打印正确的异常消息即可,Security 自动把异常添加到 HttpServletRequest 或 HttpSession 中
权限管理设置
1.使用权限表设置,如上
即权限管理流程图所示,通过实现 MyFilterSecurityInterceptor(资源管理拦截器)、MyAccessDecisionManager(授权管理器)和MySecurityMetadataSource(拦截器)进行权限拦截。
2.不通过权限表设置
2.1 使用注解方式在 controller 和 WebSecurityConfig 上进行设置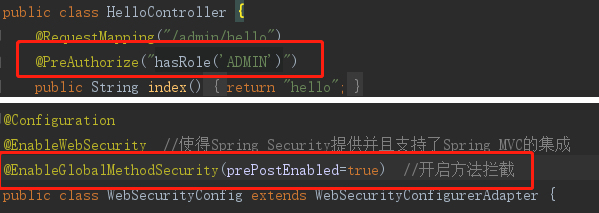
2.2 直接在 WebSecurityConfig 中 configure(HttpSecurity http) 方法进行设置
PS:hasRole() 方法默认含有 ‘ROLE_’ 前缀,书写方式:‘ROLE_ADMIN’ –> hasRole(‘ADMIN’)
源码
项目 github 源码:https://github.com/xeh1430/xehProject/tree/master/security